To get started you need to set up your Application and Placements on display.io Platform:
1. Log in to your account.
2. Go to the Inventory section:
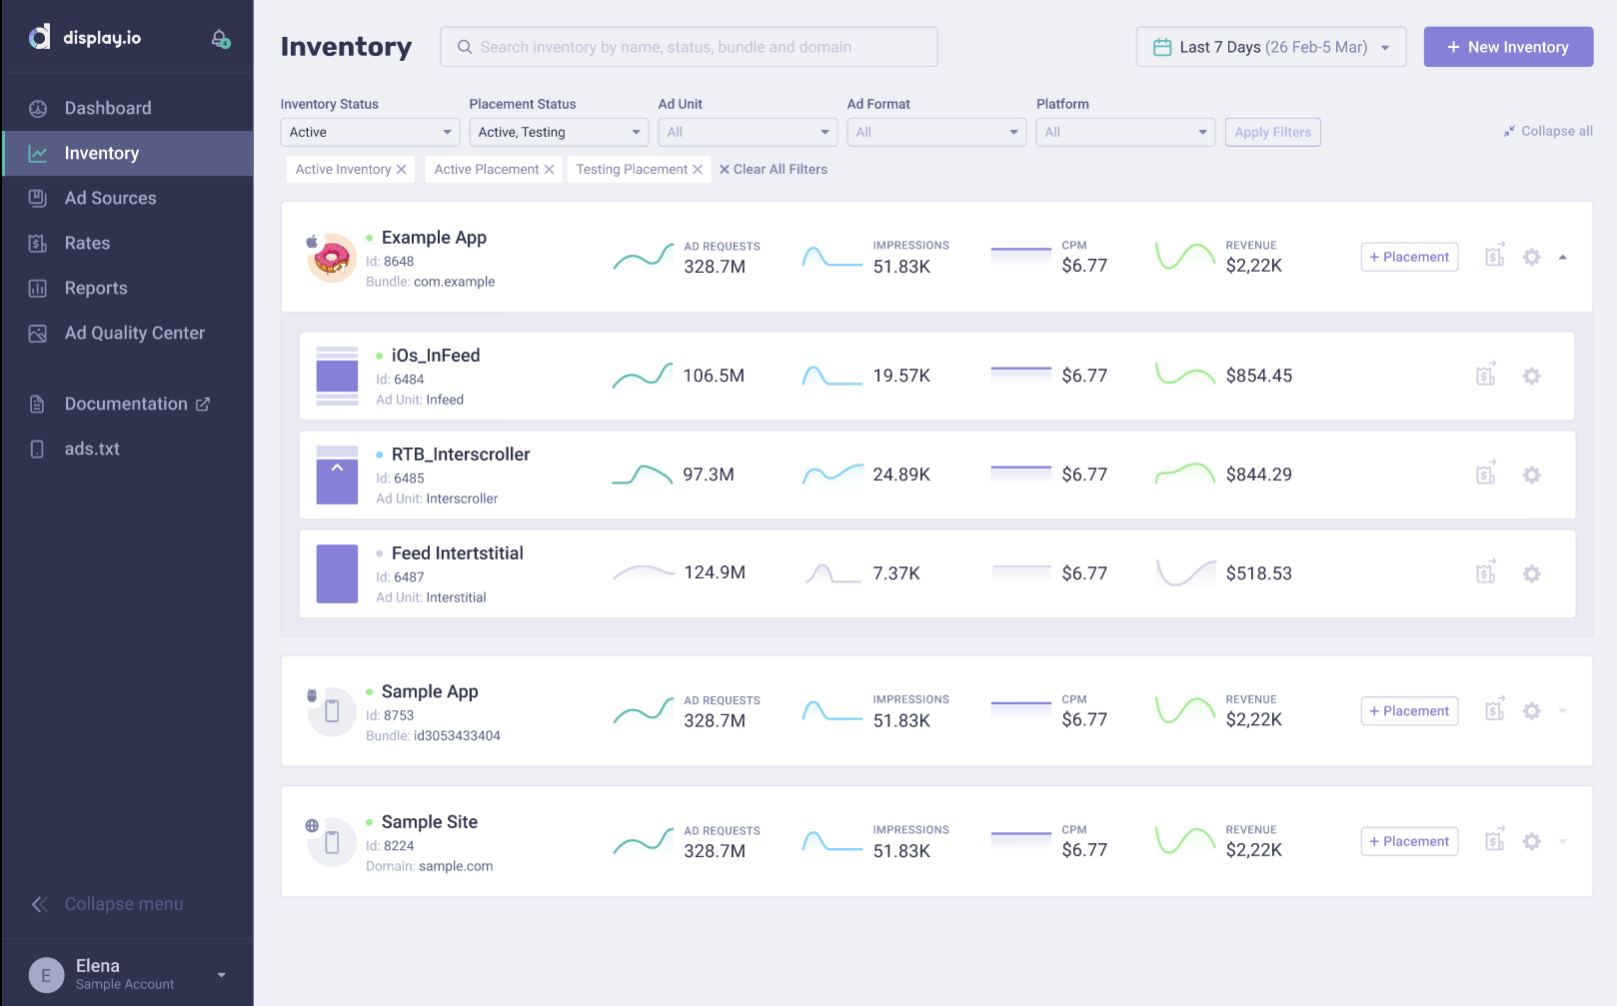
3. Create a new Inventory: select Android platform and SDK integration:

4. Add a new Placement
Important: Placements allow you to configure different ad-triggers within your app, based on predefined placements of ads. For example, you can add one placement upon app launch, another placement when a user reaches level X, and another placement in your app’s newsfeed.
Placements are bound to a specific Ad Unit type. Currently supported Ad Units/Ad Formats/Ad Sizes are:
 Interscroller (in-feed, 320×480) – Video and Display ad formats
 Interstitial / Rewarded (320×480 / 480×320) – Video and Display ad formats
 Infeed (300×250 / 320×250) – Video and Display ad formats
 Medium Rectangle (300×250) – Display ad format
 Banner (320×50) – Display ad format
To get test ad for each ad request within testing mode choose status “Testing” for your placements.

Interscroller placement setup
Installing the SDK
Before You Start Make Sure:
- App and Placement are added on Publisher Portal
- Android Studio Hedgehog or later
- minSdkVersion 21 or later
- compileSdkVersion 34 or later
1. Import SDK to your Project
Edit your project’s build.gradle file (allprojects section) in order to declare our Maven repository:
  repositories {
    google()
    mavenCentral()
    maven { url "https://maven.display.io/" }
  }
Add the following dependency to your app-module’s build.gradle file:
implementation ‘com.brandio.ads:sdk:5.6.1’
2. Update your AndroidManifest.xml
Recommended permissions (adds value to your impressions and in turn advertisers pay more for your traffic):
<uses-permission android:name="android.permission.INTERNET" />
<uses-permission android:name="android.permission.ACCESS_NETWORK_STATE" />
<uses-permission android:name="android.permission.ACCESS_WIFI_STATE" />
<uses-permission android:name="android.permission.ACCESS_COARSE_LOCATION" />
<uses-permission android:name="android.permission.ACCESS_FINE_LOCATION" />
<uses-permission android:name="android.permission.READ_PHONE_STATE" />
Initializing the SDK
Before You Start Make Sure:
- At least one App and Placement are added on Publisher Portal
- SDK is installed
Initialise the SDK upon app start. In order to do so – within your app’s main activity onCreate()method call the SDK’s Controller.init(Context activity, String appId, SdkInitListener sdkInitListener) method, after you have called setContentView().
protected void onCreate(Bundle savedInstanceState) {
  super.onCreate(savedInstanceState);
  setContentView(R.layout.activity_main);

    Controller ctrl = Controller.getInstance();

    SdkInitListener listener = new SdkInitListener() {
      @Override
      public void onInit() {
        // integration code
      }

      @Override
      public void onInitError(DIOError error) {
        // integration code
      }
    };

    ctrl.init(MainActivity.this, <Your App Id>, listener);
}
Note:
You can find your App ID in your Account on the Publisher Portal (Applications tab).
Important:
Do not try to initialise Controller more than once.
Additional: Starting Android Pie (API 28), Google isn’t allowing using a single WebView instance in 2 different processes, so in case you are using multiple processes in your application, you have to call WebView.setDataDirectorySuffix(“dir_name_no_separator”), according to documentation. We also provide opportunity to handle this inside SDK, what you need is to notify Controller object about it before call init:
ctrl.setMultipleProcessApp(true);
Requesting & Loading Ads
Before You Start Make Sure:
- At least one App and Placement set up on Publisher Portal
- SDK is installed
- SDK is initialized
- Each Ad request has “Testing” status which enables it to test integrations.
1. Requesting Ads
To request an ad you should retrieve the placement object from the Controller.
Placement placement =
     Controller.getInstance().getPlacement(placementId);
Note: You can find the Placement ID in your account on Publisher Portal in the Application tab.
You can also use your custom mute/unmute button for video ads, to disable built-in sound control use setShowSoundControl(false) method on placement object.
As a best practice, we advise our publishers to add as much user data to their ad requests as possible. The reason for that is that it gives advertisers visibility into the parameters of each user within your app and allows advertisers to bid more intelligently, meaning a higher CPM payout for publisher.
Starting from SDK version 5.0.0, the ad request structure aligns with the oRTB specification, and all the following extra parameters are available for setup:
    // use AdRequestBuilder to create and populate ad request
AdRequest adRequest = placement.newAdRequestBuilder()
   .setUserId......
   ..........
   .build();
  //use setters to populate ad request with data
public AdRequestBuilder setCat(@NonNull ArrayList<String> cat);
public AdRequestBuilder setSectionCats(@NonNull ArrayList<String> sectionCats);
public AdRequestBuilder setPageCat(@NonNull ArrayList<String> pageCat);
public AdRequestBuilder setAppVersion(@NonNull String version);
public AdRequestBuilder setPrivacyPolicy(int privacyPolicy);
public AdRequestBuilder setPaid(int paid);
public AdRequestBuilder setStoreUrl(@NonNull String storeUrl);
public AdRequestBuilder setDomain(@NonNull String domain);
public AdRequestBuilder setPublisherCats(@NonNull ArrayList<String> publisherCats);
public AdRequestBuilder setContentId(@NonNull String id);
public AdRequestBuilder setContentEpisode(int episode);
public AdRequestBuilder setContentTitle(@NonNull String title);
public AdRequestBuilder setContentSeries(@NonNull String series);
public AdRequestBuilder setContentSeason(@NonNull String season);
public AdRequestBuilder setContentArtist(@NonNull String artist);
public AdRequestBuilder setContentGenre(@NonNull String genre);
public AdRequestBuilder setContentAlbum(@NonNull String album);
public AdRequestBuilder setContentIsrc(@NonNull String isrc);
public AdRequestBuilder setContentProducer(@NonNull AppContentData.ContentProducer producer);
public AdRequestBuilder setContentUrl(@NonNull String url);
public AdRequestBuilder setContentCat(@NonNull ArrayList<String> cat);
public AdRequestBuilder setContentProdq(int prodq);
public AdRequestBuilder setContentContext(int context);
public AdRequestBuilder setContentRating(@NonNull String contentRating);
public AdRequestBuilder setContentUserrating(@NonNull String userrating);
public AdRequestBuilder setContentQagmediarating(@NonNull int qagmediarating);
public AdRequestBuilder setContentKeywords(@NonNull String keywords);
public AdRequestBuilder setContentLivestream(int livestream);
public AdRequestBuilder setContentSourcerelationship(int sourcerelationship);
public AdRequestBuilder setContentLen(int len);
public AdRequestBuilder setContentLanguage(@NonNull String language);
public AdRequestBuilder setContentEmbeddable(int embeddable);
public AdRequestBuilder setContentData(@NonNull ArrayList<AppContentData.Data> data);
public AdRequestBuilder setBidFloor(double bidFloor);
public AdRequestBuilder setChildCompliant(CompliantState state);
public AdRequestBuilder setUserId(@NonNull String userId);
public AdRequestBuilder setBuyerUId(@NonNull String buyerUId);
public AdRequestBuilder setYob(int yob);
public AdRequestBuilder setGender(UserData.Gender gender);
public AdRequestBuilder setKeywords(@NonNull String keywords);
public AdRequestBuilder setCur(@NonNull String cur);
public AdRequestBuilder setBcat(@NonNull ArrayList<String> bcat);
public AdRequestBuilder setBadv(@NonNull ArrayList<String> badv);
public AdRequestBuilder setBapp(@NonNull ArrayList<String> bapp);
public AdRequestBuilder setTmax(int tmax)
public AdRequestBuilder setTagId(@NonNull String tagId)
Note: Ad Request data should be added prior to executing the Ad Request. Setting UserId is mandatory.
To execute an Ad Request call the AdRequest object’s requestAd() method.
Apply AdRequestListener to your AdRequest object to get callback with AdProvider object that enables access to the retrieved ad.
adRequest.setAdRequestListener(new AdRequestListener() {
  @Override
  public void onAdReceived(Ad ad) {
    // integration code
  }

  @Override
  public void onNoAds(DIOError error) {
    // integration code
   }
});

adRequest.requestAd();
You can retrieve the available add data with the methods:
 Log.d(TAG, "Ad advertiserName: " + ad.getAdvertiserName());
 Log.d(TAG, "Ad advertiserClickUrl: " + ad.getAdvertiserClickUrl());
 Log.d(TAG, "Ad crid: " + ad.getCreativeId());
 Log.d(TAG, "Ad cid: " + ad.getCampaignId());
 Log.d(TAG, "Ad adomain: " + ad.getAdvertiserDomain()); // ArrayList<String>
 Log.d(TAG, "Ad auctionId: " + ad.getAuctionId());
 Log.d(TAG, "Ad ecpm: " + ad.getEcpm());
 Log.d(TAG, "Ad nurl: " + ad.getNurl());
 Log.d(TAG, "Ad lurl: " + ad.getLurl());
 Log.d(TAG, "Ad ttl: " + ad.getAdTimeToLive());
Note:
We provide GDPR compliance through the IAB’s GDPR Transparency and Consent framework. If you use a CMP that implements this IAB standard, we will be able to pick the consent state from your integrated CMP and apply it in our ad serving.
It’s highly recommended to support Win Notice and Loss Notice (according to oRTB API):
- Win Notice URL (nurl) should be called if the bid wins.
Win Notice URL example:
“nurl“:”https://appsrv.display.io/imp?msessId=tgakbyesmhfrkqa84763085712&p=2222&app=1111&metric=nurl&amw=${AUCTION_MIN_TO_WIN}”
Macro ${AUCTION_MIN_TO_WIN} should be replaced with the minimum price required to tie with the next-closest bid (2nd highest price), or the floor if there was only one bid.
- Loss Notice URL (lurl) should be called when a bid is known to have been lost.
Loss Notice URL example:
“lurl“:”https://appsrv.display.io/imp?msessId=tgakbyesmhfrkqa84763085712&p=2222&app=1111&metric=lurl&amw=${AUCTION_MIN_TO_WIN}&lr=${AUCTION_LOSS}”
Macro ${AUCTION_LOSS} should be replaced with a loss reason code (List: Loss Reason Codes).
Macro ${AUCTION_MIN_TO_WIN} should be replaced with the minimum price required to tie with the winning bid. In other words, the minimum bid price value we would have needed to submit to win the auction.
Note: If a macro is unpopulated (not replaced with a value), it should be replaced with a zero-length string.
Rendering Ads from oRTB Response
Starting from version 4.7.0 display.io SDK supports rendering and showing ads from oRTB response. SDK supports both formats display and video. You can request ads from display.io server or any other 3rd party server and use display.io SDK to show the ads.
Before start make sure you initialised SDK and have active placements within your inventory on display.io Platform.
Once you got an oRTB response string you can load the ad for one of your placement. You can create any Ad Unit you want, supported Ad Unit list you can find at Ad Units Integration section.
Note: you are responsible for creating Ad Unit that match retrieved ad size. E.g. if you got oRTB response with ad size 300×250 you should not create Interstitial or Interscroller ad from that markup.
To create the Ad from oRTB response follow the next sample:
        Placement placement = Controller.getInstance().getPlacement(YOUR_PLACEMENT_ID);
        if (placement == null) return;

        switch (plcType) {
            case BANNER: {
                BannerPlacement bannerPlacement = (BannerPlacement) placement;
                bannerPlacement.loadBannerFromORTB(ortbResp, new Placement.OnORTBLoadListener() {
                    @Override
                    public void onLoaded(Ad ad) {
                        View adView = bannerPlacement.getBanner(ORTBActivity.this, ad.getRequestId());
                        insertAdView(adView);
                    }

                    @Override
                    public void onFailToLoad(DIOError e) {
                        // handle FAILED_TO_LOAD_ORTB_AD event
                    }
                });
                break;
            }
            case MEDIUMRECTANGLE: {
                MediumRectanglePlacement mediumRectanglePlacement = (MediumRectanglePlacement) placement;
                mediumRectanglePlacement.loadMRECTFromORTB(ortbResp, new Placement.OnORTBLoadListener() {
                    @Override
                    public void onLoaded(Ad ad) {
                        View adView = mediumRectanglePlacement.getMediumRectangle(ORTBActivity.this, ad.getRequestId());
                        insertAdView(adView);
                    }

                    @Override
                    public void onFailToLoad(DIOError e) {
                        // handle FAILED_TO_LOAD_ORTB_AD event
                    }
                });
                break;
            }
            case INFEED: {
                InfeedPlacement infeedPlacement = (InfeedPlacement) placement;
                infeedPlacement.loadInfeedFromORTB(ortbResp, new Placement.OnORTBLoadListener() {
                    @Override
                    public void onLoaded(Ad ad) {
                        // the ad is ready to be rendered
                    }

                    @Override
                    public void onFailToLoad(DIOError e) {
                        // handle FAILED_TO_LOAD_ORTB_AD event
                    }
                });
                break;
            }
            case INTERSCROLLER: {
                InterscrollerPlacement interscrollerPlacement = (InterscrollerPlacement) placement;
                interscrollerPlacement.loadInterscrollerFromORTB(ortbResp, new Placement.OnORTBLoadListener() {
                    @Override
                    public void onLoaded(Ad ad) {
                        // the ad is ready to be rendered
                    }

                    @Override
                    public void onFailToLoad(DIOError e) {
                        // handle FAILED_TO_LOAD_ORTB_AD event
                    }
                });
                break;
            }
            case INTERSTITIAL: {
                InterstitialPlacement interstitialPlacement = (InterstitialPlacement) placement;
                interstitialPlacement.loadInterstitialFromORTB(ortbResp, new Placement.OnORTBLoadListener() {
                    @Override
                    public void onLoaded(Ad ad) {
                        ad.showAd(ORTBActivity.this);
                    }

                    @Override
                    public void onFailToLoad(DIOError e) {
                        // handle FAILED_TO_LOAD_ORTB_AD event
                    }
                });
                break;
            }
        }
Once the ad was loaded you can show it. Refer to Ad Units Integration section for displaying specific ad unit manual.
DIO SDK AI Integration Manual
Automated Android SDK integration using Claude Code AI Agent.
Overview
The DIO SDK Integration Agent automates the entire SDK integration process, reducing integration time from 2-4 hours to 10-20 minutes. The agent handles project analysis, dependency management, code generation, and build verification automatically.
Prerequisites
Before starting, ensure you have:
- Claude Code CLI — AI-powered development tool
- Android Project — Gradle-based, minSdk ≥ 24
- DIO Credentials — App ID and Placement IDs from DIO Platform
- Internet Connection — Required to fetch SDK version and resources
Installing Claude Code
# macOS / Linux (Homebrew)
brew install --cask claude-code

# macOS / Linux (curl)
curl -fsSL https://claude.ai/install.sh | bash

# Verify installation
claude --version
Installation
Option A: Quick Install (Recommended)
Run this command from any directory:
bash <(curl -fsSL https://raw.githubusercontent.com/displayio/DIOSDK/main/claude-agents/install.sh)The agent will be installed globally to ~/.claude/agents/ and available in all projects.
Option B: Manual Download
- Download
dio-android-integrator.mdfrom GitHub repository - Place it in your project folder
- Ready to use
Usage
Step 1: Navigate to Your Project
cd /path/to/your/android/projectStep 2: Launch Claude Code
claudeStep 3: Request Integration
Use dio-android-integrator.md to integrate DIO SDK.

Config:
- App ID: YOUR_APP_ID
- Placements:
  - Interstitial: PLACEMENT_ID
  - Banner: PLACEMENT_ID
  - InFeed: PLACEMENT_ID
  - Interscroller: PLACEMENT_ID
  - Inline: PLACEMENT_ID
Step 4: Wait for Completion
The agent will work autonomously for approximately 10-20 minutes. During this time it will:
- 🔍 Analyze your project structure
- 📦 Detect existing ad SDKs (AdMob, AppLovin, Unity Ads, etc.)
- ⬇️ Fetch latest DIO SDK version from Maven
- 📝 Add dependencies and repositories
- 🔧 Create initialization and configuration classes
- 🔄 Implement waterfall strategy (DIO first → fallback)
- 🏗️ Build and auto-fix any errors
- ✅ Validate successful integration